Brushing teeth, it seems like people are either really into it or just don't care…

How To Pull A Tooth At Home
We are in the age of DIY. There are several cable TV networks and magazines that are completely dedicated to teaching us how to make wine racks out of salvaged pallets or how to turn an unruly backyard into a summertime oasis. The key to success is knowing how big of a task you are capable of seeing through to completion.
DISCLAIMER: 99.9998% of dental work should be handled by a qualified dental professional.
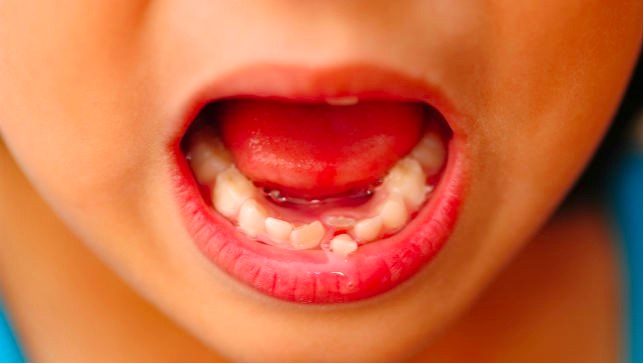
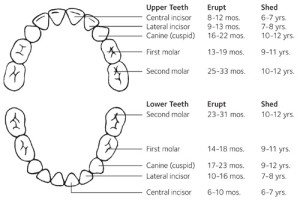
Children begin replacing baby teeth with their adult teeth around age 6. Your child’s dentist will use x-rays to monitor the eruption status of the permanent teeth, as well as to look for tooth decay and other abnormal pathology. Sometimes baby teeth may become stuck in the bone and will not move for the permanent tooth coming in behind it. In this instance your dentist may elect to pull to baby tooth, to allow for the permanent tooth to come in. The process of baby teeth transitioning to permanent teeth is continuously monitored by the dentist until all the adult teeth are in, usually around age 12.

This is where the disclaimer comes in. Most teeth (and dental work in general) should be done by a dentist who is trained in the various procedures and in how to manage any potential complications. However, there are some teeth that are so loose that they may be pulled at home. Many times a dentist will see a tooth like this and instruct the parents how to pull the tooth at home, when it is finally ready.
Step 1
Clean: Wash your hands with soap and water. MAke sure your child has brushed their teeth.
Step 2
Assess: Ask your child to open her mouth to enable you to see and touch the tooth. Wiggle it gently with your finger to determine its degree of looseness. If the tooth is still firmly attached and does not seem loose enough to remove painlessly, tell your child it is not ready yet. Encourage your child to continue wiggling it to make it looser. Eating a crunchy apple is always a great way to loosen a tooth. If the tooth seems loose enough — just hanging by a thread of root — it’s ready to come out.
Step 3
Pull: Grab a piece of gauze and place it around the baby tooth (make sure you grab the right one). Ask your child if they want to help, many times they are excited to give the final yank of a tooth they have been flicking for weeks. Grasp the tooth firmly through the gauze. Test to see if there will be pain, moving the tooth gently before actually twisting it to enable them to feel any associated pain. Whenever your child is ready, twist the tooth quickly to pull it out.
Step 4
Place a clean gauze or cotton roll over the gums where the tooth came out. Minimal bleeding is normal. Avoid hard/crunchy foods until any tenderness on the gums is resolved.
Success!
Congratulations, you now have the power to add one more DIY project to your to-do list. The steps above are a simple, safe, doctor approved method to pull a baby tooth. It will save a trip to your dentist and make for a fun Friday night.
The tooth fairy has asked me to let readers know that she does not accept bloody teeth. Make sure to rinse the tooth in hydrogen peroxide over the sink. This will clean the blood off and result in a bigger payout by the toothfairy. Currently, the going rate for a clean baby tooth is a $1 via cash or iTunes app store credit.
Today we will leave you with a DIY’er who took a tooth extraction to the next level. This method is not dentist-approved, but it will make you an internet sensation!


